[TOC]
常用类
包装类
基本介绍
包装类位于java.lang包,用法类似;
基本数据类型与包装类的对应关系:
| 基本数据类型 | 包装类 |
|---|---|
| byte | Byte |
| boolean | Boolean |
| short | Short |
| char | Character |
| int | Integer |
| long | Long |
| float | Float |
| double | Double |
由于包装类的常用方法类似,此处拿Integer举例;
数字相关的包装类都继承了Number类;Byte,Short,Integer,Long,Float,Double等。
常用方法示例:
1 | public class TestInteger { |
自动装箱和拆箱
1 | // 自动装箱 |
- 缓存问题:缓存[-128,127]之间的数字,系统初始化时创建的一个缓存数组;
1 | Integer a = 124; |
String
1 | public final class String |
- String类是不可变字符序列;
- 判断String对象值是否相等使用equals()方法
常用方法
| 方法 | 解释说明 |
|---|---|
| char charAt(int index) | 返回字符串中索引为index的字符,索引范围(0,lenth()-1); |
| boolean equals(Object anObject) | 如果字符串与anObject相等,返回true;否则返回false; |
| boolean equalsIgnoreCase(String other) | 判断字符串是否相等(忽略大小写); |
| int indexOf(String str) | 返回从头开始查找的第一个子字符串str在字符串中的索引位置。如果未找到子字符串str,则返回-1; |
| int lastIndexOf() | 返回从末尾开始查找的第一个子字符串str在字符串中的索引位置。如果未找到子字符串str,则返回-1; |
| int length() | 返回字符串的长度; |
| String replace(char oldChar,char new Char) | 返回一个新串,它是通过用newChar替换此字符串中出现的所有oldChar而生成的; |
| boolean startsWith(String prefix) | 如果字符串以prefix开始,则返回true; |
| boolean endsWith(String prefix) | 如果字符串以prefix结尾,则返回true; |
| String substring(int beginIndex) | 返回一个新字符串,该串包含从原始字符串beginIndex到串尾; |
| String substring(int beginIndex, int endIndex) | 返回一个新字符串,该串包含从原始字符串beginIndex到串尾或endIndex-1的所有字符; |
| String toLowerCase() | 返回一个新字符串,该串将原始字符串中的所有大写字母改成小写字母; |
| String toUpperCase() | 返回一个新字符串,该串将原始字符串中的所有小写字母改成大写字母; |
| String trim() | 返回一个新字符串,该串删除了原始字符串头部和尾部的空格 |
StringBuilder和StringBuffer
StringBuilder和StringBuffer共同的父类AbstractStringBuilder
1 | abstract class AbstractStringBuilder implements Appendable, CharSequence { |
- StringBuilder和StringBuffer是可变字符序列;
- StringBuffer JDK1.0版本提供的类,线程安全,做线程同步检查,效率较低;
- StringBuilder JDK1.5版本提供的类,线程不安全,不做线程同步检查,因此效率较高,常用;
常用方法
| 方法 | 解释说明 |
|---|---|
| public StringBuilder append(…) | 重载的方法,可以为StringBuilder对象添加字符序列,仍然返回自身对象; |
| public StringBuilder delete(int start,int end) | 可以删除从start到end-1为止的一段字符串序列,仍然返回自身对象; |
| public StringBuilder deleteCharAt(int index) | 移除此序列索引为index的字符,仍然返回自身对象; |
| public StringBuilder insert(…) | 重载的方法,可以为StringBuilder对象在指定位置插入字符序列,仍然返回自身对象; |
| public StringBuilder reverse() | 将字符串序列逆序,仍然返回自身对象; |
| public String toString() | 返回此序列中数据的字符串表示形式; |
| public void setCharAt(int index,char c) | 将c替换到原字符序列索引为index的位置; |
| indexOf(),substring(),length(),charAt() | 类似String类中的方法; |
时间处理相关类
以1970年1月1日 00:00:00定为基准时间,度量单位为毫秒(千分之一秒)
用long类型的变量保存时间;
获得现在时刻的“时刻数值”,
1
long now = System.currentTimeMillis();
Date
1 | public class Date |
- Date的构造方法返回了当前时间的毫秒值,说明新创建的Date对象的时间为当前时间;
- Date带参构造,参数是一个毫秒数,表示从基准时间过了参数毫秒值的时间;
- boolean after(Date when) 判断此时间是否在指定时间之后;
- boolean before(Date when) 判断此时间是否在指定时间之前;
- boolean equals(Date when)判断两个日期的相等性;
- long getTime() 返回自基准时间到该Date对象时间所经过的毫秒数;
- String toString() 把Date对象转换成java源码中设定格式的字符串输出;
DateFormat
- 把时间对象转化成指定格式的字符串,反之,把指定格式的字符串转化成时间对象;
- DateFormat是一个抽象类,一般使用它的子类SimpleDateFormat类来实现
方法:
| 方法 | 解释说明 |
|---|---|
| public String format(Date date) | 返回将date转化为指定格式的字符串; |
| public Date parse(String str) | 将指定格式的字符串转化为Date对象并返回; |
1 | //把时间对象转成字符串 |
其他格式化字符:SimpleDateFormat
比如 D 表示当前时间是当前年份的第多少天
Calendar
- Calendar类是一个抽象类,为我们提供了关于日期计算的相关功能,比如:年月日时分秒的展示和计算;
- GregorianCalendar是Calendar的一个具体子类,提供了世界上大多数国家/地区使用的标准日历系统;
- 注意:0-11表示对应的月份,0是1月,11代表12月;
- 1-7表示星期,1是星期日,7代表星期六
方法:
- get(param):根据传的参数,获得对应的日期属性;
- set(params):根据参数,给日期对象设置日期属性;
- add(params):根据参数,进行日期的计算;
- Date getTime():转化成一个时间类对象;
- Calender setTime(Date date):将时间类对象转化为日期类;
可视化日历程序
1 | String str = "2020-2-29"; //平年天数超出不做判断 |
Math
- abs :绝对值
- sqrt :平方根
- pow(double a, double b) :a的b次幂
- max,min :最大最小值
- ceil(double a) :大于a的最小整数
- floor(double a) :小于a的最大整数
- random() :返回0.0到1.0的随机数
- long round(double a) :double类型的数据a转成long型(四舍五入)
Random
专门用于生成随机数的类;
1 | Random rand = new Random(); |
File
- java.io.File类:代表文件和目录;
- 构造方法:传入一个目录地址;
1 | File f = new File("d:\\a.txt"); |
常用方法:
| 方法 | 说明 |
|---|---|
| public boolean exists() | 判断File是否存在 |
| public boolean isDirectory() | 判断File是否为目录 |
| public boolean isFile() | 判断File是否为文件 |
| public long lastMidified() | 返回File最后修改时间 |
| public long length() | 返回File大小 |
| public String getName() | 返回文件名 |
| public String getPath() | 返回文件的目录路径 |
创建新目录:
1 | File f = new File("d:/电影/华语/大陆"); |
递归遍历目录树结构:
1 | public static void main(String[] args) { |
枚举
JDK1.5引入了枚举类型,枚举类型的定义包括枚举声明和枚举体。
1
2
3enum 枚举名{
枚举体(常量列表)
}枚举体就是放置一些常量;
枚举类型隐性地继承自java.lang.Enum。
枚举实质上还是类,而每个被枚举的成员实质就是一个枚举类型的实例,他们默认都是public static final修饰的,提议直接通过枚举类型名使用它们;
1 | enum Season { |
容器/集合
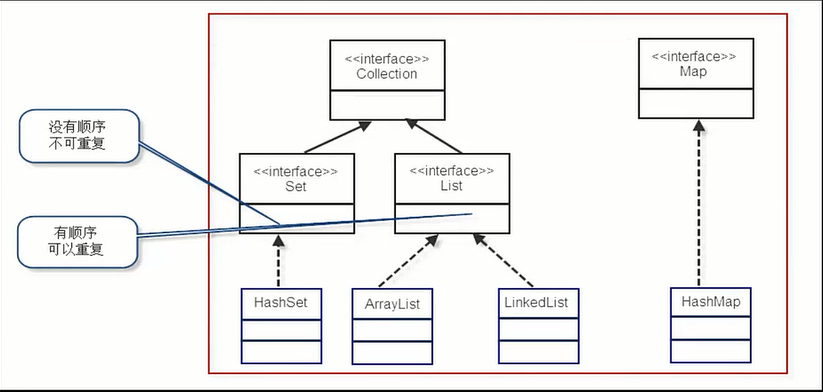
1.Collection
Collection:容器,集合。
子接口List可以重复,有顺序;Set不可重复,无顺序。
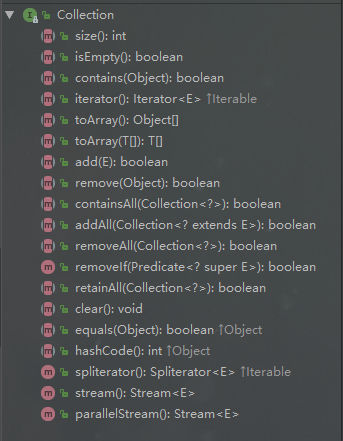
2.Collection接口方法
List和Set作为Collection的子接口,继承Collection的所有方法。
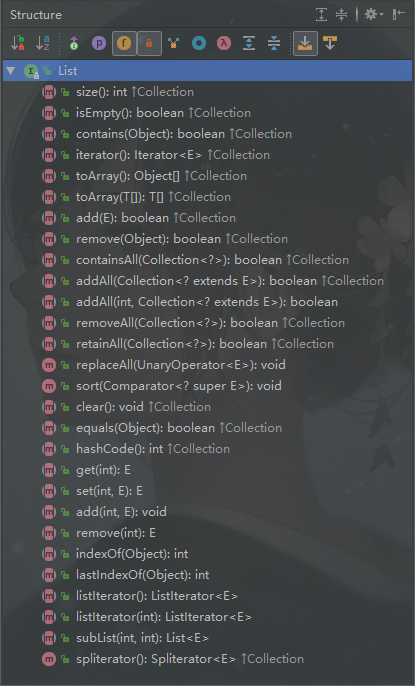
3.List接口的实现类
ArrayList:数组实现,适合随机查找和遍历,不适合插入和删除。
LinkList:链表结构,适合数据的动态插入和删除,随机访问和遍历速度比较
慢。
Vector:数组实现,保证了线程同步
接口方法:
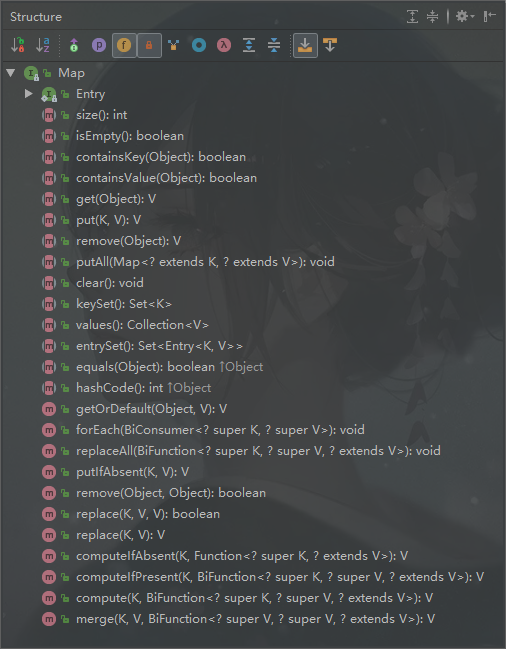
4.Map接口
存储键值对,key-value形式,键不可重复。
接口方法:
5.使用迭代器Iterator遍历集合
遍历List
1 | List<String> list = new ArrayList<>(); |
遍历Map
第一种方式:
1 | Map<Integer,String> map = new HashMap<>(); |
第二种方式:
1 | Map<Integer,String> map = new HashMap<>(); |
遍历Set
1 | Set<String> set = new HashSet<>(); |
多线程
1.创建线程常用的两种方法
继承Thread类
1 | package com.tassel.thread; |
实现Runable接口
1 | package com.tassel.thread; |
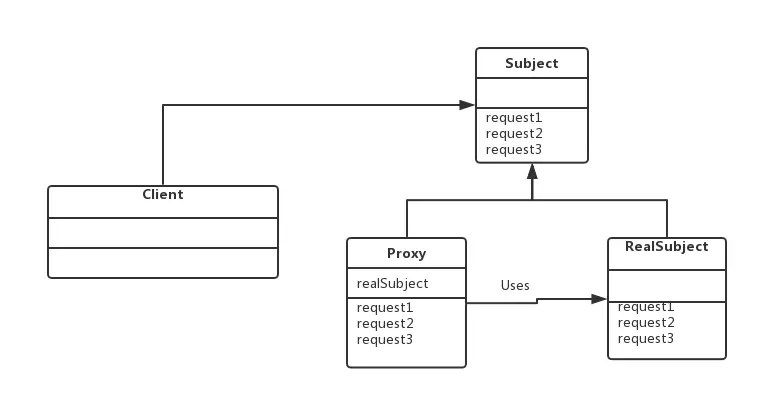
2.java设计模式——静态代理
- RealSubject:真实角色,是实现抽象接口的类。
- Proxy:代理角色,内部含有对真实对象
RealSubject的引用,从而可以操作真实对象。代理对象提供与真实对象相同的接口,以便在任何时刻都能代替真实对象。同时,代理对象可以在执行真实对象操作时,附加其他的操作,相当于对真实对象进行封装。 - Subject : 接口,是对象和它的代理共用的接口,让
RealSubject和Proxy具有一致性。
1 | package com.tassel.thread; |
3.jdk8 lambda表达式
介绍
λ:希腊字母表中排序第十一位的字母,英语名称为Lambda。最早出现是用于计算的[λ演算
lambda calculus,后来被函数式编程语言广泛采用。语法:
前面的小括号内可以传一个到多个参数,参数类型可以省略,lambda表达式会自动匹配对应的类型;
参数只有一个时,可省略参数类型和小括号;
后面的表达式只有一行时,可省略花括号;
当借口方法存在返回值,且后面的表达式只有一行,可以省略花括号和return;
1 | (parameters) -> expression |
- 注意:使用lambda需要保证实现的接口只有一个方法!
lambda推导示例
外部类->静态内部类->局部内部类->匿名内部类->lambda表达式
1 | package com.tassel.thread; |
lambda实现多线程
1 | package com.tassel.thread; |
4.线程状态
- 初始状态:实现Runable接口或继承Thread类的子类new实例化后,线程进入初始状态;
- 就绪状态:等待调度,进入运行状态;
- 当线程对象调用start()方法,线程进入就绪状态(并没有开始执行);
- 阻塞事件解除进入就绪状态;
- 运行状态下调用yield()方法,进入就绪状态;
- jvm将cpu从本机线程切换到其他线程,子线程进入就绪状态;
- 运行状态:就绪状态的线程被cpu所调度,进入运行状态;
- 阻塞状态:
- sleep()
- wait()
- join()
- IO操作,read,write…
- 终止状态:线程运行结束,或被终止;
java.io
核心类
| 类 | 说明 |
|---|---|
| File | 文件类 |
| InputStream | 字节输入流 |
| OutputStream | 字节输出流 |
| Reader | 字符输入流 |
| Writer | 字符输出流 |
| Closeable | 关闭流接口 |
| Flushable | 刷新流接口 |
| Serializable | 序列化接口 |
注意:这里输入输出是以程序为中心的,从数据源写到程序中的成为输入流,从程序中写出去的叫输出流
分类
- 按流动方向:输入流、输出流;
- 按功能:节点流、处理流(包装流);处理流是以节点流为基础的
- 按数据:字节流、字符流;字符流的本质是字节流
File
Fields
| Modifier and Type | Field | Description |
|---|---|---|
static String |
pathSeparator |
The system-dependent path-separator character, represented as a string for convenience. |
static char |
pathSeparatorChar |
The system-dependent path-separator character. |
static String |
separator |
The system-dependent default name-separator character, represented as a string for convenience. |
static char |
separatorChar |
The system-dependent default name-separator character. |
File类的成员变量都是静态常量,其中separatorChar是名称分隔符,用来代替文件路径中的\,在不同的系统平台表示不同的含义;
Constructor
| Constructor | Description |
|---|---|
File(File parent, String child) |
Creates a new File instance from a parent abstract pathname and a child pathname string. |
File(String pathname) |
Creates a new File instance by converting the given pathname string into an abstract pathname. |
File(String parent, String child) |
Creates a new File instance from a parent pathname string and a child pathname string. |
File(URI uri) |
Creates a new File instance by converting the given file: URI into an abstract pathname. |
相对路径和绝对路径
- 绝对路径是指目录下的绝对位置,直接到达目标位置,通常是从盘符开始的路径。
- 相对路径是相对于当前文件所在目录与其他文件的路径关系;
常用方法
| Methods | Description |
|---|---|
getName(),getPath(),getAbsolutePath(),getParent() |
得到名称或路径 |
exists,isFile,isDirectory |
是否存在?是文件?文件夹? |
length() |
表示文件的长度(字节数) |
createNewFile(),delete() |
创建新文件(不存在创建,存在返回true),删除文件 |
对于length()方法,如果判断的File对象是文件夹时返回为0;如果文件不存在时也返回0;
而对于文件夹的大小则需要通过递归遍历来完成;
操作目录的方法:
| Methods | Description |
|---|---|
mkdir() |
创建目录,确保上级目录存在,不存在创建失败; |
mkdirs() |
上级目录不存在一同创建 |
list() |
列出下级名称 |
listFiles() |
列出下级File对象 |
listRoot() |
列出所有盘符 |
递归遍历目录统计文件夹的大小(所有层级文件的大小)
1 | public class CountDirectory { |
文件编码
编码(encode):字符->字节
解码(decode):字节->字符
乱码原因:
- 字节数不够
- 字符集不统一
四大抽象类
| 抽象类 | 说明 | 常用方法 |
|---|---|---|
InputStream |
字节输入流的父类,数据单位为字节 | int read(),void close() |
outputStream |
字节输出流的父类,数据单位为字节 | void write(int),void flush(),void close() |
Reader |
字符输入流的父类,数据单位 | int read(),void close() |
Writer |
字符输出流的父类,数据单位为字符 | void write(String),void flush(),void close() |
IO流操作步骤
- 创建源
- 选择流
- 操作(读、写)
- 释放系统资源
文件与字节数组之间的转化
1.文件—>程序—>字节数组
- 文件输入流,字节数组输出流
2.字节数组—>程序—->文件
- 字节数组输入流,文件输出流
文件字节输入流
1 | // 1.创建源 |
文件字节输出流
1 | // 1.创建源 |
字节数组输入流
释放资源 可以不用处理close是空方法
1 | //1、创建源 |
字节数组输出流
可以不用创建源,类内部维护;
选择流:ByteArrayOutputStream不用关联源;
可以不用释放资源,close()是空方法;
1 | //1、创建源 内部维护不用创建 |
示例:文件与字节数组的转化
1 | public class IOTest { |
装饰器设计模式
装饰器设计模式在IO中主要用于上面分类中的处理流,即下面即将介绍的各种处理流,起装饰作用;
装饰器设计模式由四部分组成
- 抽象组件:需要装饰的抽象对象,(接口或抽象类)
- 具体组件:实现抽象组件,需要装饰的对象;
- 抽象装饰类:实现抽象组件,包含了对抽象组件的引用,并声明装饰方法;
- 具体装饰类:继承抽象装饰类,实现抽象方法,可以有多个;
示例:
1 | /** |
字节缓冲流
构造方法
public BufferedInputStream(InputStream in):创建一个 新的缓冲输入流。public BufferedOutputStream(OutputStream out): 创建一个新的缓冲输出流。
构造举例,代码如下:
1 | // 创建字节缓冲输入流 |
字符缓冲流
构造方法
public BufferedReader(Reader in):创建一个 新的缓冲输入流。public BufferedWriter(Writer out): 创建一个 新的缓冲输出流。
构造举例,代码如下:
1 | // 创建字符缓冲输入流 |
特有方法
字符缓冲流的基本方法与普通字符流调用方式一致,不再阐述,我们来看它们具备的特有方法。
- BufferedReader:
public String readLine(): 读一行文字。 - BufferedWriter:
public void newLine(): 写一行行分隔符,由系统属性定义符号。
转换流
InputStreamReader类
转换流java.io.InputStreamReader,是Reader的子类,是从字节流到字符流的桥梁。它读取字节,并使用指定的字符集将其解码为字符。它的字符集可以由名称指定,也可以接受平台的默认字符集。
构造方法
InputStreamReader(InputStream in): 创建一个使用默认字符集的字符流。InputStreamReader(InputStream in, String charsetName): 创建一个指定字符集的字符流。
构造举例,代码如下:
1 | InputStreamReader isr = new InputStreamReader(new FileInputStream("in.txt")); |
OutputStreamWriter类
转换流java.io.OutputStreamWriter ,是Writer的子类,是从字符流到字节流的桥梁。使用指定的字符集将字符编码为字节。它的字符集可以由名称指定,也可以接受平台的默认字符集。
构造方法
OutputStreamWriter(OutputStream in): 创建一个使用默认字符集的字符流。OutputStreamWriter(OutputStream in, String charsetName): 创建一个指定字符集的字符流。
构造举例,代码如下:
1 | OutputStreamWriter isr = new OutputStreamWriter(new FileOutputStream("out.txt")); |
JDBC操作数据库
- 概念:
Java DataBase ConnectivityJava 数据库连接,可以使用Java语言操作数据库; - JDBC本质:其实是官方(sun公司)定义的一套操作所有关系型数据库的规范,即接口。各个数据库厂商去实现这套接口,提供数据库驱动jar包。我们可以使用这套接口(JDBC)编程,真正执行的代码是驱动jar包中的实现类。
jdbc基本使用流程
导入驱动jar包;
注册驱动;
Class.forName("com.mysql.jdbc.Driver");获取数据库连接对象;
Connection conn = DriverManager.getConnection("jdbc:mysql://localhost:3306/db", "root", "root");定义sql;
String sql = "select * from user";获取执行sql语句的对象 Statement;
Statement stmt = conn.createStatement();执行sql,接受返回结果;
ResultSet result = stmt.executeQuery(sql);处理结果;
System.out.println(result);释放资源
stmt.close();conn.close();
Jdbc驱动对象详解
DriverManager:驱动管理对象
- 功能:
注册驱动:告诉程序使用哪种数据库驱动jar
方法:
static void registerDriver(Driver driver)问题:写代码时为什么使用
Class.forName("com.mysql.jdbc.Driver");来注册驱动呢?解释:在
com.mysql.jdbc.Driver类中存在如下静态代码块,而静态代码块会随着类的加载而同步加载到内存中,从而达到了使用DriverManager来注册驱动的目的。1
2
3
4
5
6
7static {
try {
java.sql.DriverManager.registerDriver(new Driver());
} catch (SQLException E) {
throw new RuntimeException("Can't register driver!");
}
}注意:mysql5之后的驱动jar包,可以省略注册驱动的步骤。
获取数据库连接:
方法:
static Connection getConnection(String url, String user, String password)参数:
- url:
jdbc:mysql://ip地址(域名):端口号/数据库名称; - user:数据库用户名;
- password:数据库用户密码;
如果连接的是本机mysql服务器,并且mysql服务默认端口是3306,则url可以简写为:jdbc:mysql:///数据库名称。
- url:
Connection:数据库连接接口
- 功能
获取执行sql的对象
Statement createStatement()PreparedStatement prepareStatement(String sql)管理事务
- 开启事务:setAutoCommit(boolean autoCommit) 调用该方法设置参数为false,即开启事务;
- 提交事务:commit() ;
- 回滚事务:rollback();
Statement:执行SQL的接口
boolean execute(String sql):可以执行任意的sql;int executeUpdate(String sql):执行DML(insert、update、delete)语句、DDL(create,alter、drop)语句;- 返回值:影响的行数,可以通过这个影响的行数判断DML语句是否执行成功 返回值>0的则执行成功,反之,则失败。
ResultSet executeQuery(String sql):执行DQL(select)语句;
1
2
3
4
5
6
7
8
9
10
11
12
13
14
15
16
17
18
19
20
21
22
23
24
25
26
27
28
29
30
31
32
33
34
35
36
37
38
39
40
41Statement stmt = null;
Connection conn = null;
try {
//1.注册驱动
Class.forName("com.mysql.jdbc.Driver");
//2.创建连接
conn = DriverManager.getConnection("jdbc:mysql:///db1", "root", "root");
//3.sql
String sql = "insert into stu2 values(null,'Tom',18)";
//4.创建Statement执行sql对象
stmt = conn.createStatement();
//5.执行sql
int result = stmt.executeUpdate(sql);
//6.处理结果
System.out.println(result);
if (result > 0) {
System.out.println("添加成功");
} else {
System.out.println("添加失败");
}
} catch (ClassNotFoundException e) {
e.printStackTrace();
} catch (SQLException e) {
e.printStackTrace();
} finally {
//7.释放资源
if (stmt != null) {
try {
stmt.close();
} catch (SQLException e) {
e.printStackTrace();
}
}
if (conn != null) {
try {
conn.close();
} catch (SQLException e) {
eprintStackTrace();
}
}
}ResultSet:结果集接口
boolean next(): 游标向下移动一行,判断当前行是否是最后一行末尾(是否有数据),如果是,则返回false,如果不是则返回true;getXxx(参数):获取数据Xxx:代表数据类型 如:
int getInt(),String getString();参数:int:代表列的编号,从1开始 如:
getString(1); String:代表列名称。 如:
getDouble("name");
1
2
3
4
5
6
7
8
9
10
11
12
13
14
15
16
17
18
19
20
21
22
23
24
25
26
27
28
29
30
31
32
33
34
35
36
37
38
39
40
41
42
43
44
45
46
47
48
49
50//提升对象作用域,方便释放资源
Connection conn = null;
Statement stmt = null;
ResultSet rs = null;
try {
//注册驱动
Class.forName("com.mysql.jdbc.Driver");
//创建数据库连接对象
conn = DriverManager.getConnection("jdbc:mysql:///db1", "root", "root");
//定制sql
String sql = "select * from stu2";
//创建执行sql的对象Statement
stmt = conn.createStatement();
//执行sql
rs = stmt.executeQuery(sql);
//处理结果
while (rs.next()) {
int id = rs.getInt(1);//传索引
String name = rs.getString("name");//传列名
int age = rs.getInt("age");
System.out.println(id + "**" + name + "**" + age);
}
} catch (ClassNotFoundException e) {
e.printStackTrace();
} catch (SQLException e) {
e.printStackTrace();
} finally {
//释放资源
if (rs != null) {
try {
rs.close();
} catch (SQLException e) {
e.printStackTrace();
}
}
if (stmt != null) {
try {
stmt.close();
} catch (SQLException e) {
e.printStackTrace();
}
}
if (conn != null) {
try {
conn.close();
} catch (SQLException e) {
e.printStackTrace();
}
}
}PrepareStatement:执行SQL的接口,Statement的子接口
SQL注入问题:在拼接sql时,有一些sql的特殊关键字参与字符串的拼接。会造成安全性问题
- 输入用户随便,输入密码:a' or 'a' = 'a- sql:
select * from user where username = 'fhds' and password = 'a' or 'a' = 'a'
- sql:
解决sql注入问题:使用PreparedStatement对象来解决;
预编译的SQL:参数使用?作为占位符;
步骤:
注册驱动
获取数据库连接对象Connection
定义SQL时:sql的参数使用?作为占位符。
如:
select * from user where username = ? and password = ?获取执行sql语句的对象 PreparedStatement
Connection.prepareStatement(String sql)给?赋值:
方法: setXxx(参数1,参数2)
- 参数1:?的位置编号 从1 开始
- 参数2:?的值
执行sql,接受返回结果,不需要传递sql语句
Jdbc数据库连接池
概念:祈使句就是一个存放数据库连接的容器(集合);当系统初始化好后,容器被创建,容器中会申请一些连接对象,当用户来访问数据库时,从容器中获取连接对象,访问完后,将连接对象归还给容器。
优点:节约资源、用户访问高效;
使用:
标准接口:DataSource,javax.sql包;
方法:
获取连接:getConnection()
归还连接:close() 这里不同于普通使用方法的关闭连接释放资源,而是归还连接对象给连接池;
实现:由提供数据库驱动jar的数据库厂商来实现;
常用的数据库连接池:
- C3P0:
- Druid:ali